Microsoft Excel Basics
Microsoft Excel is an excellent spreadsheet program that is a very powerful tool. In this basics class, we will be using it to enter data, sort it, and make a chart/graph from the data.
First, the default size for text in Excel is 9 or 10, which is pretty small. Similar to changing text in a table in Microsoft Word, you have to choose several cells at once to change. If you don’t, the text will only be changed in the cell that is highlighted. Highlight all the cells you want to change, then click on Format à Cells, then click on the font tab and change the size. If the size you want isn’t displayed in the size window, you can type in the size you want to change it to.
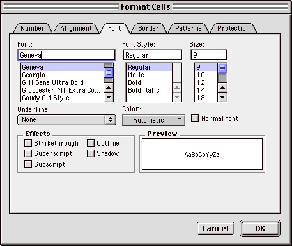
All text will automatically be aligned to the left of each cell, while number will be aligned to the right. To change this, click on the alignment tab of the Format à Cells window. You can change the horizontal and vertical alignment.
To adjust the column width and row height, click on any cell, then move your mouse to the top of the column (where the letters are) or the left side of the row (where the numbers are). Put your mouse on the line between two columns or rows. Your mouse will change into a line with two arrows on it. Click and hold the mouse button while moving the mouse left or right, up or down—this is called click and drag—to adjust the height of the row or width of the column.
![]()
Entering data
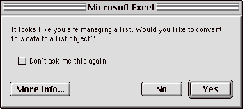 When entering data, it’s usually a
good idea to put column headings. In Office 2001 for Mac, your computer may
ask you at some point if you want to convert your data to a list. I usually
tell it no, because it doesn’t allow me to use some of the functions I like to
use.
When entering data, it’s usually a
good idea to put column headings. In Office 2001 for Mac, your computer may
ask you at some point if you want to convert your data to a list. I usually
tell it no, because it doesn’t allow me to use some of the functions I like to
use.
Keep your column heading all in the same row. To move from cell to cell, you can use the tab key, the arrows, or your mouse. To move to the next line, hit return.
Sorting Data
Once you have your data entered, you can sort it ascending (lowest to highest or A-Z) or descending (highest to lowest or Z-A). To sort, click anywhere in your data field, then go to Data à Sort, which will bring up the sort window.
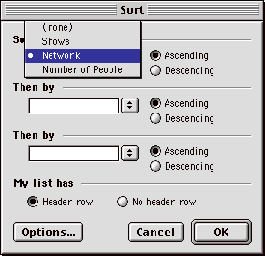
If your column headings are all in line, your sort choices should be your column headings. Pick one of the column headings, choose ascending or descending and click on OK. Note: If you use the sort buttons on the standard toolbar, only one column will be sorted. The rest of your data will remain where it is.
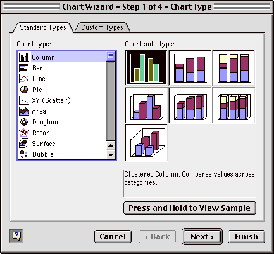
Making a chart
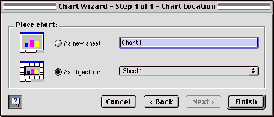
To make a chart, highlight all the data you want to be in the chart, then go to Insert à Chart (you can also use the chart wizard button on the toolbar). This will take you through a series of steps to make and label your chart. The most important window is the first one, where you choose which type of chart to make and can preview what it will look like. To preview it, find the button that says ‘click and hold to preview.’ If there is nothing in your chart, you need to click cancel and make sure that you have the correct data highlighted and nothing more or less. If you have blank lines highlighted, it will include those blank lines in your chart and it will probably not look the way you want it to. After you have gone through all the steps, pay very close attention to the final step, where it asks if you want the chart as a new sheet or as an object in the current sheet. It is usually a good idea to make it a new sheet, so it has it’s own place in the workbook.