eClass Grades: Getting Started
eClass Grades is a gradebook program the integrates with MacSchool. Although it is a separate program from MacSchool, it is from the same company and has the same look and feel as MacSchool.
To open eClass Grades, select the icon from the list of items in the Items for Lindop Staff folder on your desktop.
eClass Grades will open with a new class window:
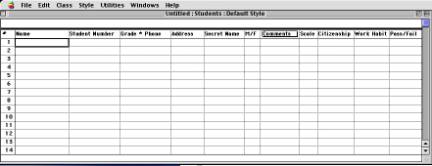
Before you start putting student information in, there are some things you may change in this window. By clicking on StyleàStudent Data, you will get a window with options for entering student data for your class.
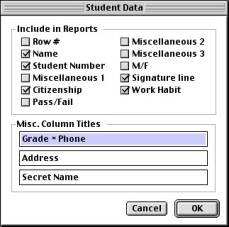 The top half of the window has options for what to
include in progress reports. You may change these according to your own
preferences. The bottom half of the window contains the Miscellaneous Column
Titles. In the window above, you can see 3rd, 4th, and 5th
columns are the miscellaneous columns. You may want to change these columns to
something more useful, such as phone numbers, and parent’s names instead of
secret names. After changing the column titles, you will want to go to FileàSave
Style so that all of your classes
will come up with the column titles you have defined.
The top half of the window has options for what to
include in progress reports. You may change these according to your own
preferences. The bottom half of the window contains the Miscellaneous Column
Titles. In the window above, you can see 3rd, 4th, and 5th
columns are the miscellaneous columns. You may want to change these columns to
something more useful, such as phone numbers, and parent’s names instead of
secret names. After changing the column titles, you will want to go to FileàSave
Style so that all of your classes
will come up with the column titles you have defined.
Entering Student Data
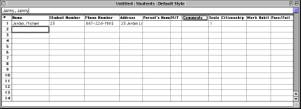 The Student Data window works much the way a
spreadsheet works—you click on the cell you want to enter data into and type it
in. What you type will appear at the top of the screen and when you press
return, an arrow key, or the tab key, the data will appear in the cell.
The Student Data window works much the way a
spreadsheet works—you click on the cell you want to enter data into and type it
in. What you type will appear at the top of the screen and when you press
return, an arrow key, or the tab key, the data will appear in the cell.
To edit text in a cell, you must click on the cell, then go to the top of the window and edit the text from there. Note: If you click on a cell and hit the space bar or any other key, it will erase what is in the cell.
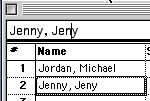
When entering student data, always format it as Last, First. This will make the data come out on your reports correctly. Putting a student’s first name first will cause problems with the reports. You will not be able to enter anything for comments until you have comments set up, which we will do later.
Adjusting the column width is the same in eClass Grades as it is in Excel. To change the column width, place your cursor on a line in between columns. When the cursor changes to a double arrow, you can click and drag the line to the left or right to change the column width.
Class Menu
The class menu is where you can set up many of your preferences for eClass Grades. We’ll go through the list in order.
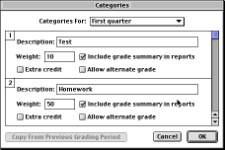 ClassàCategories…
This menu is where you set up your categories for assignments and weights for each category, if you choose to do so. The weight is a percentage. You can also choose to include a grade summary for each category in your reports, so that students may see if their child is weak in a particular area (such as homework or tests). You can choose to have an extra credit category as well.
ClassàGrading Periods…
You will want to adjust this when you are ready to start your second grading period. For the time being, leave it as it is.
ClassàOverall Summaries…
This is another category you will want to leave as is until you have more than one grading period.
ClassàGrading Scales…
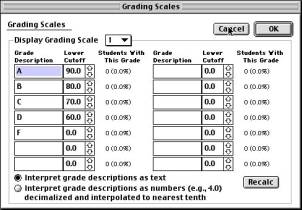 This is something you will want to adjust right away.
You can enter the grade description and the percentage cutoff for each grade.
You can have multiple grading scales, so that if you have some special needs
students whose grading scales need to be adjusted, you can have them on a
grading scales that reflects their abilities, rather than adjusting it by hand.
Once you have assignments and score in the grade book, this window will also show
the number of students in a class who have that particular grade.
This is something you will want to adjust right away.
You can enter the grade description and the percentage cutoff for each grade.
You can have multiple grading scales, so that if you have some special needs
students whose grading scales need to be adjusted, you can have them on a
grading scales that reflects their abilities, rather than adjusting it by hand.
Once you have assignments and score in the grade book, this window will also show
the number of students in a class who have that particular grade.
ClassàSpecial Scores…
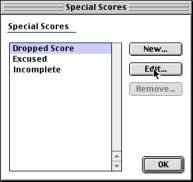 The special scores category is used for putting a
marker in place of a grade, such as an excused assignment, dropped score, or
incomplete. To edit these, or add new special scores, use the buttons on the
side. The default settings are that these markers, placed in the grade book,
will not affect a student’s grade. The only change you may want to make is to
the Incomplete marker. Instead of using it to not change a student’s score,
you may want to use it as a marker for a 0 that the student is making up. To
do this, click on Incomplete, then click Edit. The window pictured below is
for the Dropped Score, but the Incomplete one will look identical.
The special scores category is used for putting a
marker in place of a grade, such as an excused assignment, dropped score, or
incomplete. To edit these, or add new special scores, use the buttons on the
side. The default settings are that these markers, placed in the grade book,
will not affect a student’s grade. The only change you may want to make is to
the Incomplete marker. Instead of using it to not change a student’s score,
you may want to use it as a marker for a 0 that the student is making up. To
do this, click on Incomplete, then click Edit. The window pictured below is
for the Dropped Score, but the Incomplete one will look identical.
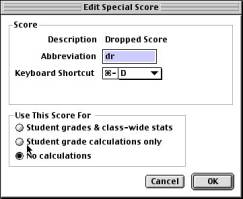 To change this to a 0 instead of not affecting the
student’s score at all, you would click on the button next to Student grades
& class-wide stats. Under the Keyboard Shortcut, another line would appear
that says % equivalent and a box in which you can put a percent into. It
defaults to 0.
To change this to a 0 instead of not affecting the
student’s score at all, you would click on the button next to Student grades
& class-wide stats. Under the Keyboard Shortcut, another line would appear
that says % equivalent and a box in which you can put a percent into. It
defaults to 0.
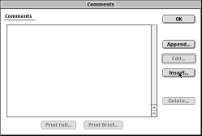 ClassàComments…
 This is where you set up your comments for progress
reports. To insert a comment, click on the insert button. This will open a
new window in which you can type your comments. At the bottom of this window, there
is a Variables menu. In order to save on typing, you can choose variables that
will change for each student.
This is where you set up your comments for progress
reports. To insert a comment, click on the insert button. This will open a
new window in which you can type your comments. At the bottom of this window, there
is a Variables menu. In order to save on typing, you can choose variables that
will change for each student.
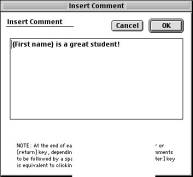
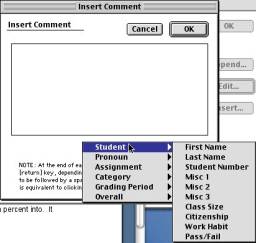 By choosing StudentàFirst
Name and then typing your comment, the student’s first name and your comment
will appear in the report:
By choosing StudentàFirst
Name and then typing your comment, the student’s first name and your comment
will appear in the report:
Be sure to push return after the comment, so if you place more than one comment they won’t run together. To place comments on student reports, go to the Students window and put the number of the comment you wish to have in the report in the comment cell. If you wish to have multiple comments, separate them with a comma.
Setting up Assignments
Click on WindowsàAssignments to bring up the assignments window.
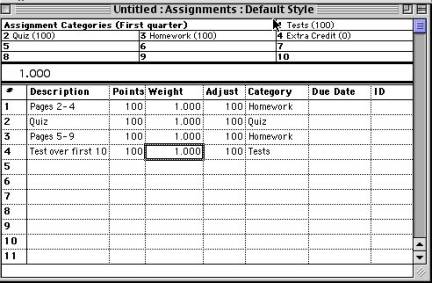
The categories you entered in the ClassàCategories… window are listed at the top, along with the weights you assigned to each category. To place assignments, click in the cell under description, type a description of the assignment, then move to the Points column and put in the number of points for that assignment. You can also weight assignments individually by putting a weight for each. In the Category column, it will default to the first category. To change it, type in the number of the category you want the assignment to be. In my example, I would type a 3 if it was homework.
Entering Scores
Clicking on WindowsàScores will open the scores window.
 As you move around the sheet, the assignment
description at the top will change based on which column you are in. The
Assignment description also tells you how many points the assignment was worth.
As you enter scores, the grade book will calculate the student’s overall grade
for you and give you a letter grade equivalent based on your grade
descriptions. You may also enter special scores (dropped, excused, incomplete)
by clicking on the Sp. Scores box in the upper right corner and picking a
special score to enter.
As you move around the sheet, the assignment
description at the top will change based on which column you are in. The
Assignment description also tells you how many points the assignment was worth.
As you enter scores, the grade book will calculate the student’s overall grade
for you and give you a letter grade equivalent based on your grade
descriptions. You may also enter special scores (dropped, excused, incomplete)
by clicking on the Sp. Scores box in the upper right corner and picking a
special score to enter.
Printing Reports
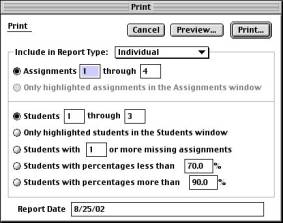 To print a report, go to FileàPrint.
Select the type of report you want to print at the top (Include in Report Type). You can adjust your preferences in this window for who you want to print reports for. Make sure you have added your comments in the comment column of the students window before you print the reports. To see what a report will look like before you print it, click on the Preview button.
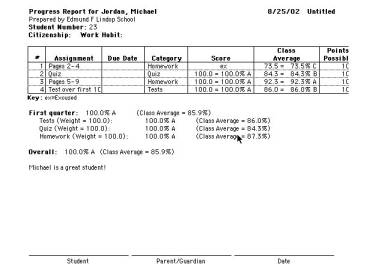 As you can see, the comment variables have worked, as
it says “Michael is a great student.” At the bottom of the preview window are
buttons to go to the next report, to print or to close.
As you can see, the comment variables have worked, as
it says “Michael is a great student.” At the bottom of the preview window are
buttons to go to the next report, to print or to close.
Group reports will show each student’s grade on each assignment, a breakdown of how each student did in each category, and overall grades for the grading period.